
Installing a mini split air condition system is a smart move if you’re looking for energy efficiency, zoned climate control, and a sleek design without the need for ductwork. Whether you’re a DIY enthusiast or just want to understand what a professional will do, this guide covers every step.
Understanding Mini Split Air Conditioning Systems
What is a Mini Split AC?
A mini split air conditioner, also known as a ductless mini split, is a type of heating and cooling system that doesn’t require ductwork. It consists of two main components: an indoor air-handling unit and an outdoor compressor. These are connected by a conduit containing the power cable, refrigerant tubing, suction tubing, and a condensate drain.
Benefits Over Central HVAC Systems
Mini splits offer many advantages over traditional central HVAC systems:
- Zoned Comfort: Control individual room temperatures.
- Energy Efficiency: No energy loss from ductwork.
- Flexible Installation: Easy to install in homes without existing ducts.
- Quiet Operation: Indoor units are quiet, perfect for bedrooms and studies.
Key Components of a Mini Split System
Indoor Air Handling Unit
This unit is mounted on a wall inside the room and disperses conditioned air. It contains the evaporator coil and fan.
Outdoor Compressor Unit
Installed outside, this unit houses the compressor, condenser coil, and fan. It’s the powerhouse of the system, pushing refrigerant through the lines.
Refrigerant Lines and Drainage
These lines connect the indoor and outdoor units. They transport refrigerant and include a condensate drain to remove moisture from the system.
Preparing for Installation
Tools and Materials Needed
You’ll need:
- Drill and hole saw
- Pipe cutter
- Level and stud finder
- Refrigerant line set
- Electrical wiring
- Wall brackets or mounting hardware
Choosing the Right Location
For best performance:
- Indoor unit should be centrally located in the room.
- Outdoor unit should be on a flat surface with good airflow and protection from direct sunlight.
Electrical and Safety Considerations
Check your electrical system’s compatibility. Mini splits often require a dedicated 240V circuit. Always turn off the power before working with electrical wiring.
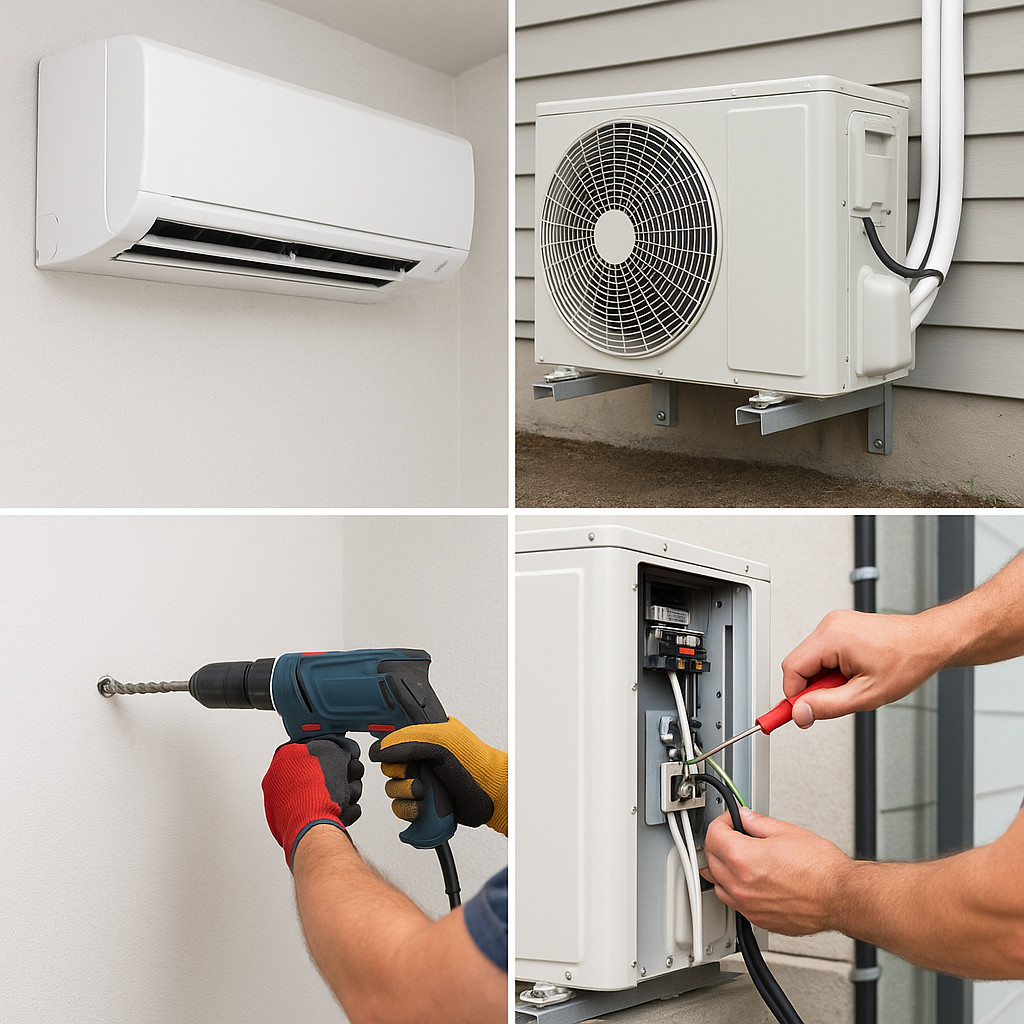
Step-by-Step Installation Process
Mounting the Indoor Unit
- Mark and install the mounting plate.
- Drill a hole (about 3 inches) for the refrigerant lines and wiring.
- Attach and secure the indoor unit to the mounting plate.
Installing the Outdoor Unit
- Place the unit on a concrete pad or wall bracket.
- Ensure it’s level and has at least 12 inches of clearance on all sides.
Running Refrigerant Lines
- Feed the refrigerant lines, drain tube, and control wire through the hole.
- Connect them to both indoor and outdoor units.
- Seal the hole with expanding foam or caulk.
Connecting the Electrical Wiring
- Follow the manufacturer’s wiring diagram.
- Secure connections using weatherproof connectors.
- Connect to your home’s electrical panel via a dedicated breaker.
Sealing and Insulation Tips
Preventing Energy Loss
Wrap refrigerant lines in foam insulation. This prevents heat gain and improves efficiency.
Ensuring Airflow Efficiency
Keep the indoor and outdoor units free of obstructions like curtains or vegetation to maintain proper airflow.
Common Installation Mistakes and How to Avoid Them
Incorrect Sizing
Undersized units won’t cool effectively, while oversized ones short cycle, wasting energy.
Poor Drainage Setup
Always slope the condensate drain downward to avoid water backup and damage.
Improper Sealing
Unsealed holes allow air leaks, reducing system efficiency and inviting pests indoors.
DIY vs Professional Installation
When to Consider DIY
If you’re experienced with electrical work and have the right tools, DIY can save you money.
Benefits of Hiring a Licensed Technician
Professionals ensure safe, code-compliant installation and handle refrigerant charging and pressure testing.
Time and Cost Estimates
Average Installation Timeframes
- DIY: 8–12 hours
- Professional: 4–6 hours
Cost Breakdown for Parts and Labor
| Item | Average Cost |
|---|---|
| Mini Split Unit | $1,200–$2,500 |
| Installation Tools | $100–$300 |
| Professional Labor | $500–$1,500 |
Maintenance Tips Post-Installation
Cleaning Filters
Clean indoor filters monthly to prevent dust buildup and maintain airflow.
Checking Refrigerant Levels
Low refrigerant can affect cooling performance. Have levels checked annually.
Scheduling Annual Inspections
Annual professional servicing extends your unit’s life and ensures efficiency.
Troubleshooting Basic Installation Issues
Unit Not Cooling
- Check for power supply.
- Ensure mode is set to “cool.”
- Look for refrigerant leaks.
Water Leaks
- Check the condensate drain for clogs or improper slope.
Error Codes Explained
Refer to the unit’s manual. Most brands display codes for specific problems like sensor failure or compressor issues.
Energy Efficiency and Performance Optimization
Using Inverter Technology
Inverter-driven compressors adjust speed based on cooling needs, saving energy.
Programmable Thermostats
Set schedules for different zones, reducing energy use when you’re not home.
Installation in Different Settings
Homes
Ideal for older homes without ductwork or multi-story layouts.
Apartments
Offers personalized control without altering building systems.
Commercial Spaces
Perfect for small offices, salons, or server rooms needing precise temperature control.
Regulations and Permit Requirements
Local Building Codes
Always check with local authorities. Permits may be required for electrical and structural work.
EPA Guidelines
Only certified technicians should handle refrigerants per EPA regulations.
Top Brands and Product Recommendations
Mitsubishi
Known for quiet, efficient systems with superior reliability.
LG
Offers sleek designs and smart features for modern homes.
Daikin
Global leader with a strong focus on sustainability and performance.
Expert Tips for First-Time Installers
Use a Stud Finder
Ensures you mount the indoor unit securely.
Ensure Level Mounting
Prevents condensate drainage issues and uneven air distribution.
Frequently Asked Questions (FAQs)
What size mini split do I need?
It depends on the room size. A 12,000 BTU unit typically cools a 500 sq. ft. room.
Can I install it myself?
Yes, but only if you’re comfortable with electrical work and following detailed instructions.
How long does installation take?
Anywhere from 4 to 12 hours depending on experience and complexity.
Is a mini split energy-efficient?
Absolutely. They’re more efficient than traditional HVAC systems due to zoned control and inverter technology.
What maintenance is required?
Monthly filter cleaning, annual refrigerant checks, and periodic professional inspections.
Does it need a permit?
Yes, especially for electrical work and refrigerant handling. Check local codes.
Conclusion
Installing a mini split air condition system offers outstanding comfort, efficiency, and flexibility. Whether you opt for DIY or professional help, understanding the process ensures a successful and long-lasting installation. Stay cool and energy-smart all year round!